This is not another git tutorial for beginners. There are a lot of those on the internet.
I've learned a lot from them myself in the beginning of my career, and all of them are very good at building the foundation and understanding the basic concepts of version control.
If you don't know what words like 'git' and 'GitHub' mean, you should go find another beginner-friendly tutorial.
Some of them will be mentioned at the end of this blog.
I've noticed that most of the Git tutorials on YouTube doesn't give real world examples of working in production codebases.
In this blog, we are going to focus on the necessary parts of the git which you are going to use daily in your job.
I'm also NOT going to cover every feature because let's face it,
you are not going to use most of them anyway.
So, let's get started.
Quick Refresher
OK, so if you've bragged among your friends about the first "Hello World" you wrote, chances are you know about git and its basic commands, namely git clone, git add, git commit and git push.
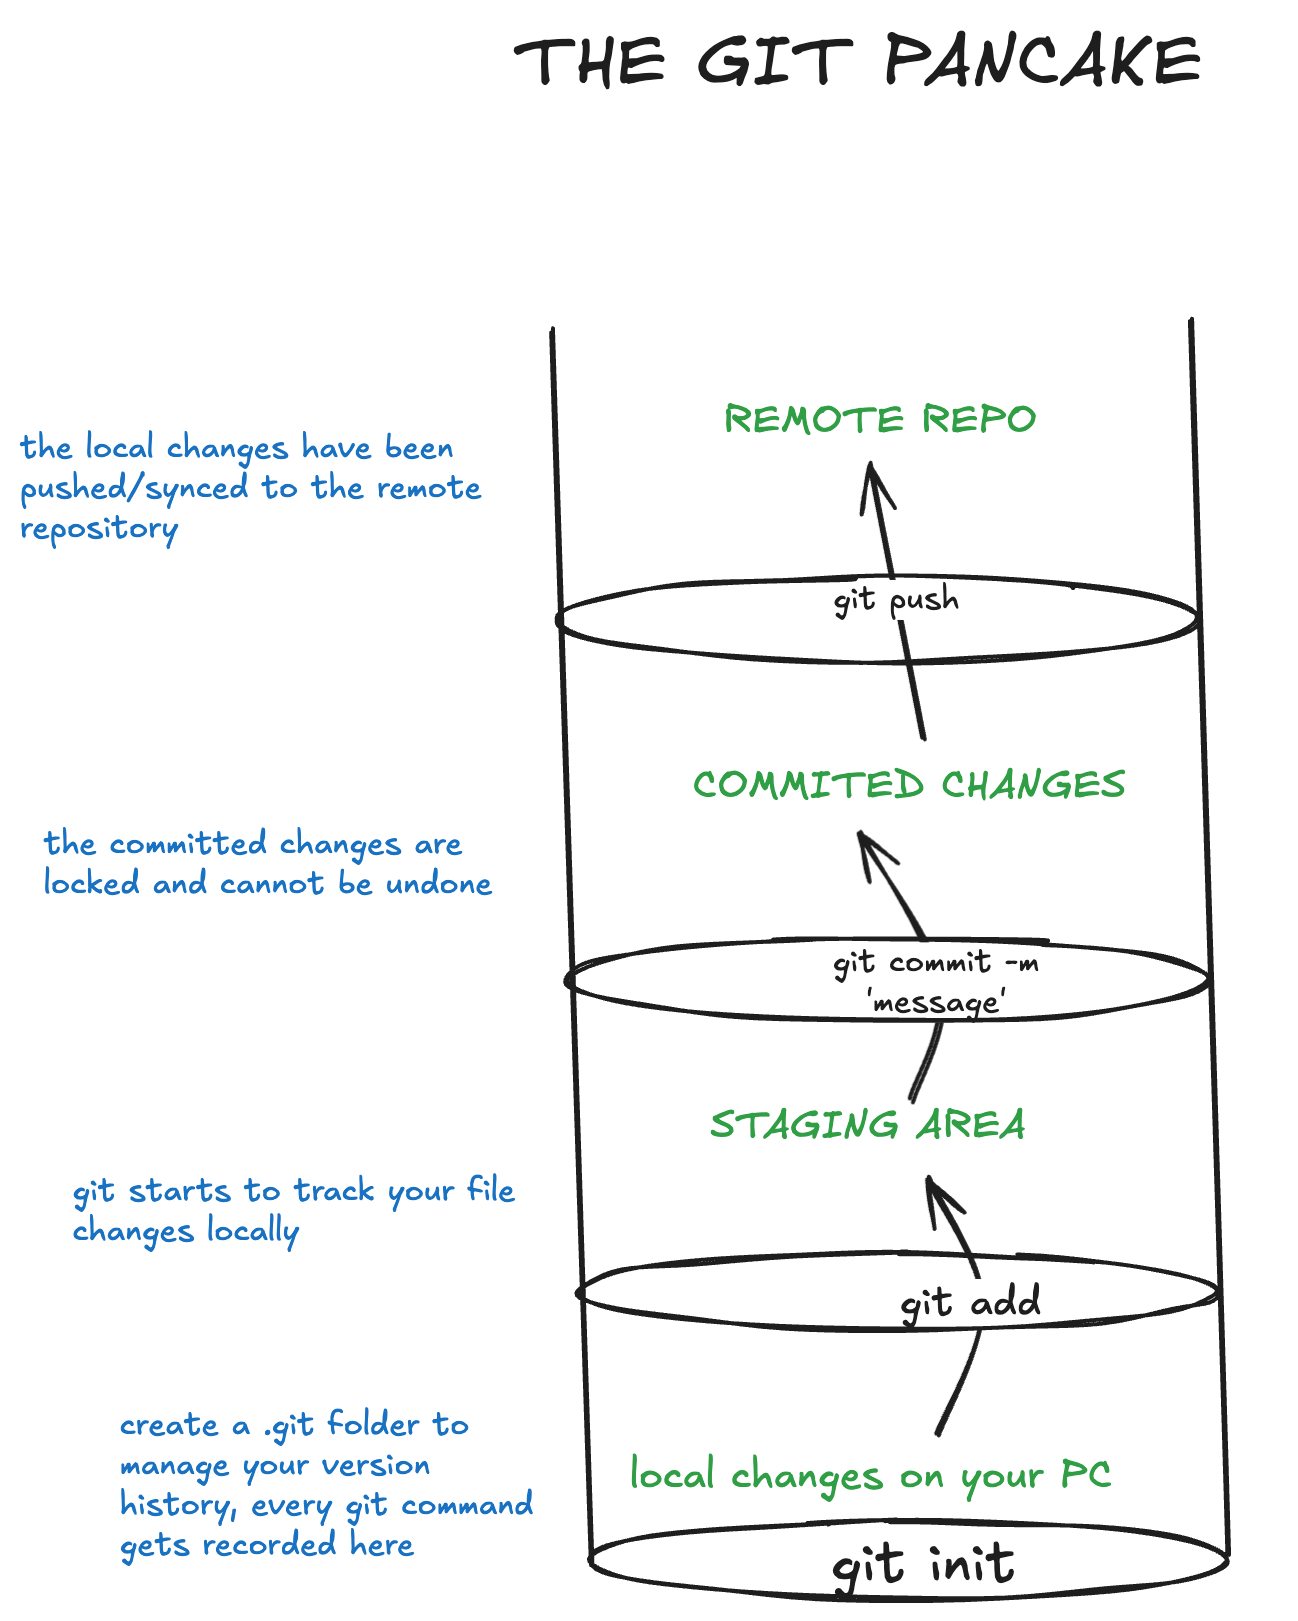
But to get a clearer understanding of it, we've visualized it as layers of a pancake in our Top most Picture for this article.
Each layer is another part of moving your changes up or not, depending on your command.
We can mainly divide the layers into three parts:
- Working directory (our local file system where any immediate changes to our files live)
- Staging area (where files go after we run "git add")
- Commit history (a permanent snapshot that will eventually be pushed to our remote repository)
All of the above commands interact with one of these layers in some way.
There are also many nuances in these commands, and basically you're never going to just use them in this simple manner in a REAL environment, but we'll get to them over the course of this article.
NOTE: we'll be using this *repo for understanding the concepts in a real world project.
Starting the Project
The most common and straightforward way to get a local development copy of your remote repo would be just fork the repo and then run git clone <repo_name> on your system, this will basically run a git init and setup you files along with all the previous git history intact.
You can also start a new project and push some files to it to follow along (recommended). GitHub already gives you a list of commands to run after you've created a new repo.
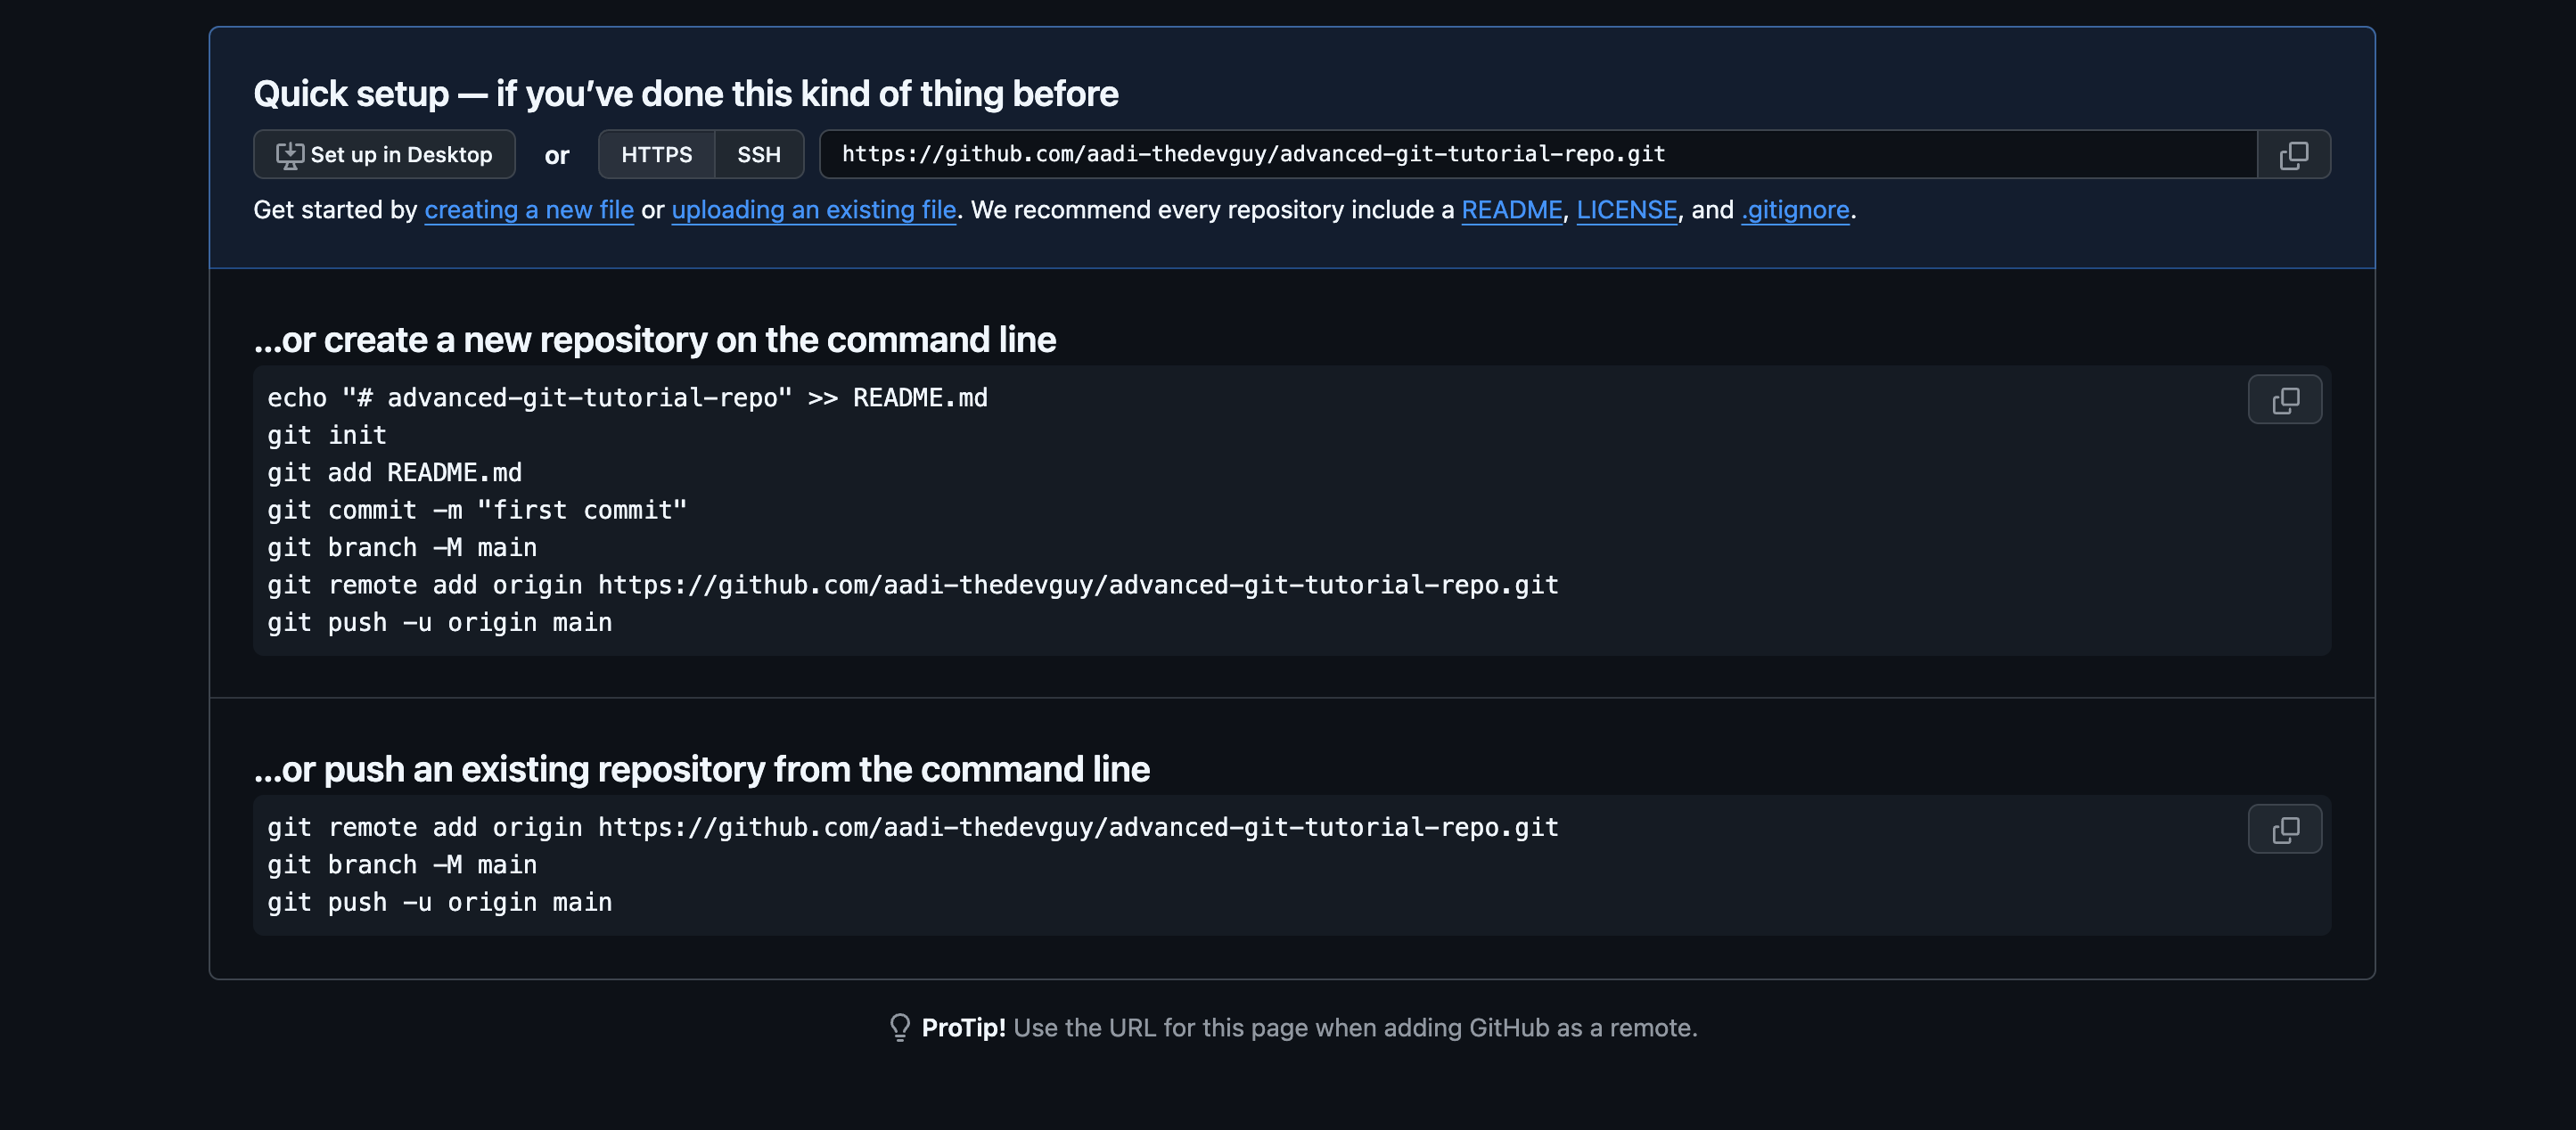
If you're using any other platforms like bitbucket or gitlab, the steps are more or less similar if you follow their respective guides.
Cloning and Branching
Cloning
git clone <repo> is the most essential and commonly used command for any developer. It creates a copy of any repository (local or remote) on your system. Developers use it when they want to dig deep and play around with the code of any repo they find interesting.
You can also pass different flags while cloning a repo.
The most commonly used flags are --branch, which only clones a specific branch
git clone <repo> --branch=feature-branch
And --depth flag, which only clones up to the history of commits specified by the flag.
git clone <repo> --depth=1
In this example, a clone <repo> is made, and only the most recent commit is included in the new cloned Repo.
This is known as shallow cloning and is most useful when working with repos that have a very large commit history.
Cloning a beefy repo with 100s of commits can take a while, so using the depth flag can help you speed up this process.
cloning also automatically creates a remote connection called "origin" pointing back to the original repository. So basically running a git remote add origin <repo_url> for you so you can keep up with the master branch changes.
NOTE: You cannot push changes to a cloned repo because, by definition, it is a clone, so you won't have the write access of the original repository.
If you want to work on this cloned copy, you have to first 'Fork' the remote repo to your account and then clone it.
Branching
Ok, so you've already got some changes at your main/master branch on your GitHub.
Generally, you also have it setup with your hosting platform, where it deploys your changes to a live website or server, ideally to a staging environment to review that your changes work before moving it to production.
Now you don't want to just mess with the existing working features pushed by other people in your team to just test you new feature.
This is where git branching comes in.
It is a way for you to test your new changes without messing up the existing ones.
For this, you can create a new branch, usually called 'Feature branches'.
So let's say you are working on a project repository with 10+ branches and want to make a new feature request to be merged to the main branch so all the other devs can PRAISE YOUR AWESOMENESS.
Let's start by listing all branches(both remote and local) for your repo.
Run the below command:
git branch --all
This will show you all the branches associated with your repo.
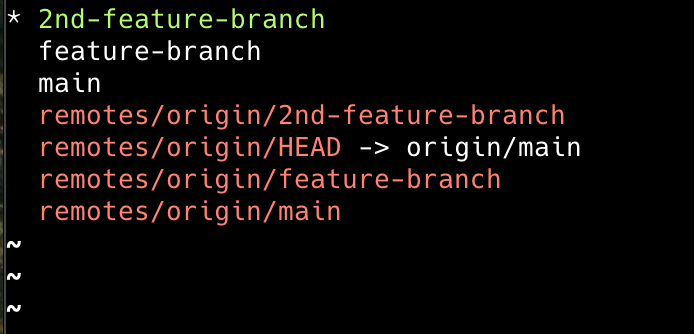
If everything went well, you can see that we get a number of branches printed in your terminal.
The asterisk(*) shows the current branch you are on.
In my case, it's the second feature branch; in your case, it will be your main branch.
The top three branches are our local branches, and the branches starting from remotes/origin are your remote branches, i.e. the branches which are in your remote repository.
You can also view your local and remote branches separately by running
git branch or git branch --list (for local)
AND
git branch -r (for remote)
Now you know the branches, next is to create a new 'my-awesome-feature-branch'. For this, run:
git checkout -b my-awesome-feature-branch
This command creates a new branch and checks you out on it.
If you already have an existing my-awesome-feature-branch, you can use
git switch my-awesome-feature-branch
Can you switch to a remote branch locally?
Well, Yes, But How?
git fetch --all comes to the rescue. (the -- all flag is optional)
It is basically a 'safe' version of git pull where, apart from its counterpart, it will fetch all the latest remote branches of your repo without updating your local changes that you've made in your working files.
You can then checkout to the specific fetched remote branch using git checkout <remotebranch>
In our example, it could be origin/feature-branch or origin/2nd-feature-branch
Ok, so now you can create a new branch or checkout to an existing branch, now it's time to make changes and push some stuff.
Contributing in a collaborative environment
Stashing your changes
Let's say you're working in a codebase and you and one other teammate are working on a huge feature on your independent branches. The feature needs the code from 10 files; you're handling 4 files, and your teammate is making changes to the other 6, and your code depends on these. Now your teammate has completed their implementation, pushed the changes to their branch, opened up a new PR, and the Team Lead approved their changes and merged them into the main branch.
Meanwhile, you are unaware of the new updated main branch and are still expecting code from outdated files.
Git stash helps you here by temporarily taking your uncommitted changes (both staged and unstaged), saving them away for later use, and then reverts them from your working copy.
In our case, whenever you find out about the updated main branch from your teammate, you'll run git stash to hide (stash) your changes, then git pull origin main to fetch the latest changes and then git stash pop OR git stash apply to get back to your working changes and then update your codebase according to the newly changed files from your teammate.
pop vs apply, which one to use?
git stash pop removes the stashed changes altogether from your local system (stash) after taking you back to your working copy, while git stash apply keeping them in the stash even after applying them in your current branch.
You'll use 'apply' if you want to apply your stashed changes to multiple branches.
In our example, when I run git stash in my 2nd-feature-branch, after making some changes, it returns the following text in the terminal
Saved working directory and index state WIP on 2nd-feature-branch: 2eac1eb Update README.md
By default, stashes are identified simply as a "WIP" (work in progress) – on top of the branch and commit that you created the stash from.
You also aren't limited to a single stash.
You can run git stash several times to create multiple stashes, and then use git stash list to view them.
For us, it'll be something like
git stash pop by default gives us the most recently created stash: stash@{0}
while git stash apply stash@{2} or git stash pop stash@{2} will give us a specific stash.
If you decide you no longer need a particular stash, you can delete it with git stash drop stash@{1}
Or you can delete all of your stashes with git stash clear
You can also view the diff of a stash just like you do for a commit by running git stash show, pass the -p flag to get the full diff like below.
git stash will not work for:
- new uncommitted files
- any files mentioned in .gitignore
So if we created an 11th file for our feature, but didn't stage it (i.e. ran git add), git stash won't stash it.
You can get around it by adding the -u option (or --include-untracked) tells git stash to also stash your untracked files.
A small issue with stash
Let's say your teammate needed to change one of the 4 files that you've been working on, and it got merged to main. Now, after you've merged the main branch into yours (obviously after stashing the local changes), when you apply those changes back, because of that one file, you'll run into a merge conflict.
git stash branch solves this problem by creating a new branch to apply your stashed changes to. So now, instead of running our git stash pop directly and solving merge conflicts, we have the option to run git stash branch new-branch-from-stash stash@{1},
This checks out a new branch based on the commit from which you created your stash, and then pops your stashed changes onto it.
The result is:
From Commit to Merge
My piece of advice in this is the same as I give to every new junior dev I've worked with over the years, that is, to always run git stash and git pull from the main branch before committing your changes and pushing to your branch (as we've covered above)
In my experience, it's always easier to fix the merge conflicts locally before raising a PR in your local system editor than resolving them during the merge.

2 Rules to abide by on how NOT to mess up your repo:
- Always have branch protection rules enabled.
- Use git revert instead of git reset (especially for public repos)
Branch protection rules are the THICK line of defense that stops someone else's mistake from ruining your week's hard work.
So no one "accidentally" pushes 5-week-old garbage code that needs to be deleted to the main branch.
Basically, you can set specific conditions for your branches to allow/block specific pull/push and commit options to the collaborators of your repo.
They work on both public and private repos.
You can enable them on GitHub by going into your repo settings and then clicking on branches in the 'Code and automation' section.
Then you can click on 'Add classic branch protection rule' to add your rule.
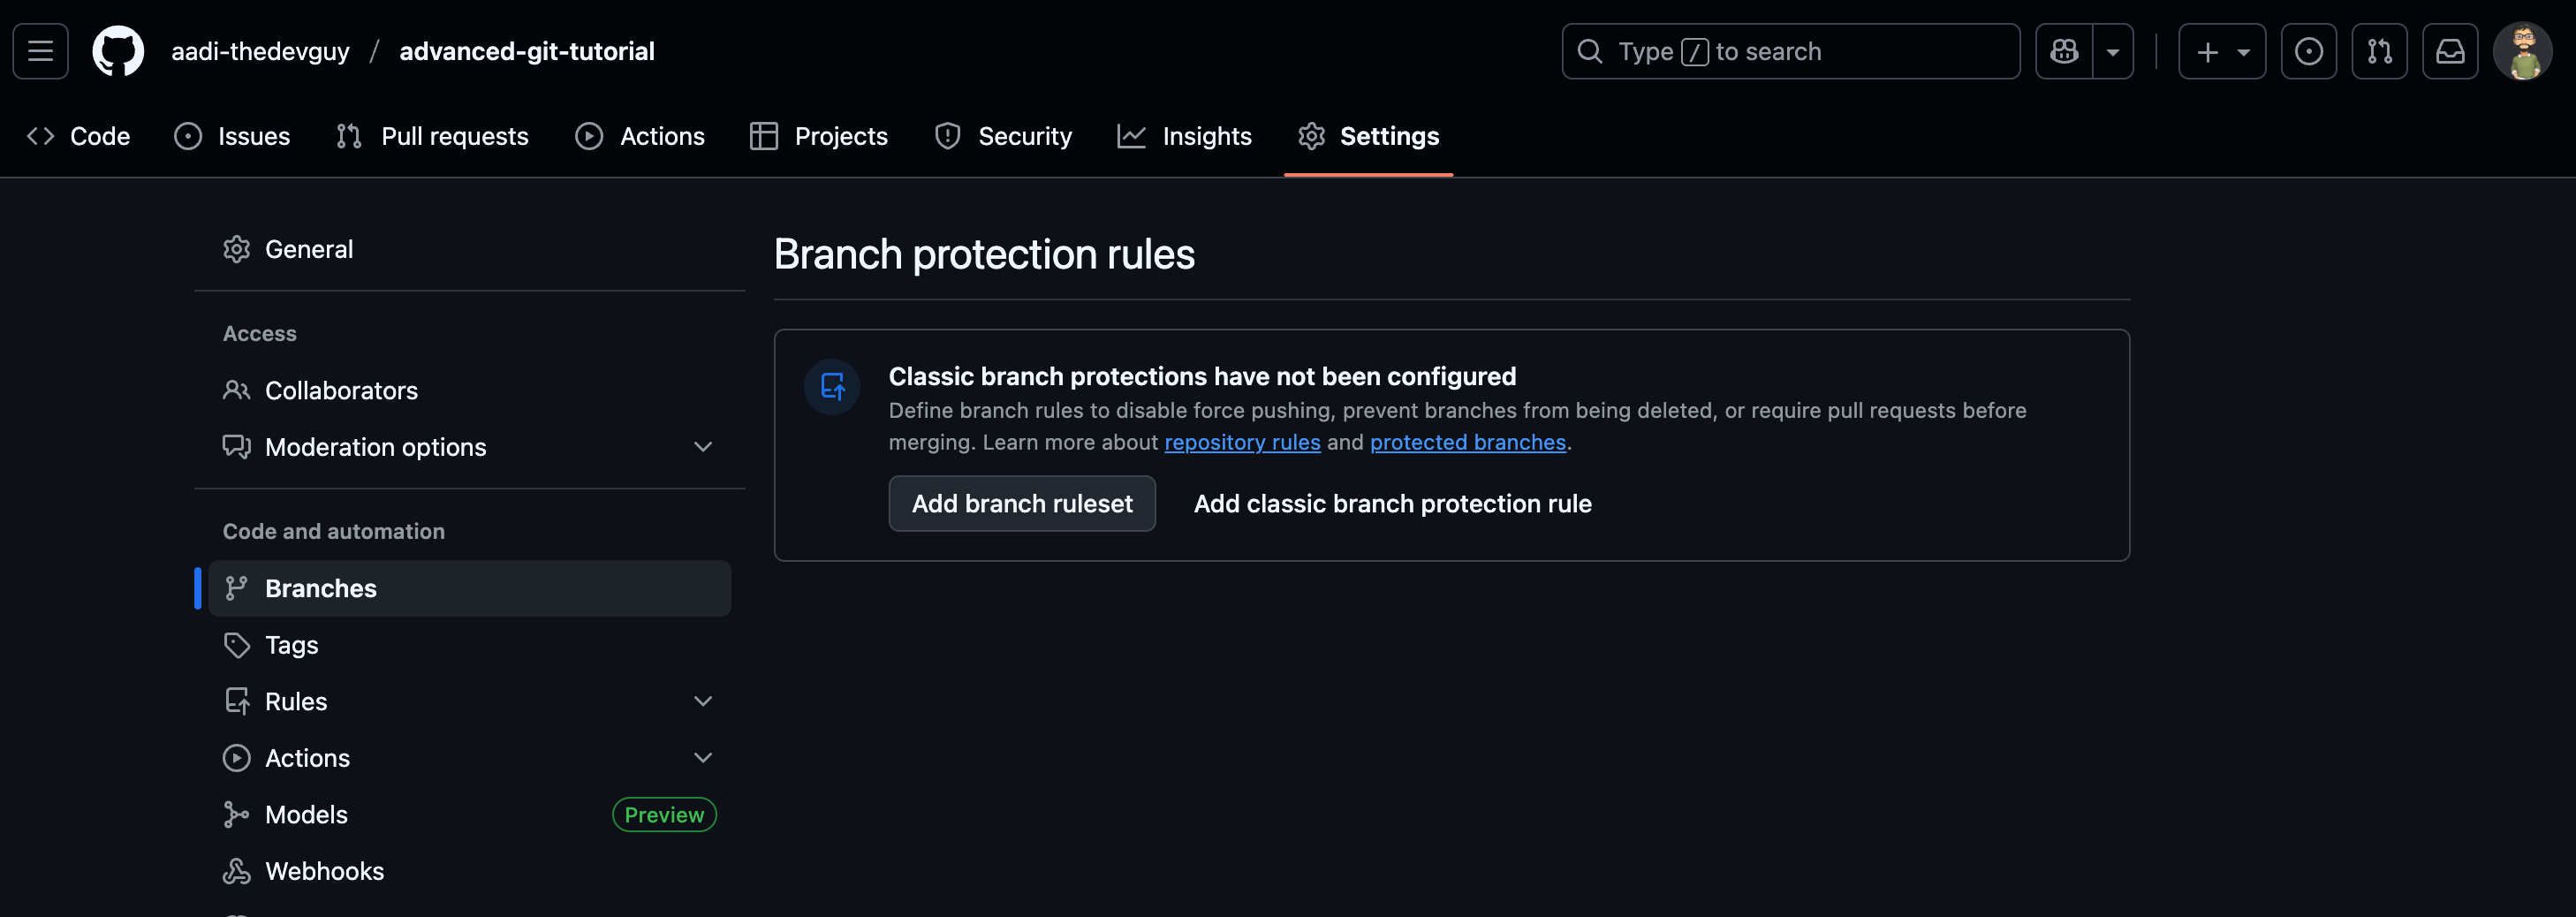
Below is the most basic rule that you MUST HAVE on your main branch.
You can customize and add more rules according to your organisation's requirements.

In the first image, you can see that we have an option to create a branch rule set,
They are a more in-depth and granular way of managing specific permissions within your organisation's multiple repos and branches.
I never really need to use them, but you can read up on them more in the GitHub docs
Now that's out of the way, let's talk about committing changes.
Or more specifically, 'undo' a committed change.
Revert vs Reset
git reset and git revert are both undo commands.
git reset "reverts" back to the previous state of a project by removing all subsequent commits up to the current branch pointer (HEAD). It can also reset your commit history, working directory or your staged changes, depending on the flag you passed to it.
Running git reset or git reset --mixed HEAD is the same.
HEAD is the specified commit. Instead of HEAD, any commit hash can be used.
For our specific project, we created 4 commits on our new branch 'git reset demo'
When we run our git log, we see the following:
Now let's run git reset --soft b96894a to reset back to our second commit.
Now, if we run our git log to see our commit history, we'll see that our second commit will now be the latest.
Look closely as we're also using the --soft flag here. Using it tells git to only change the commit history, and do not affect our current working directory and staged files.
Meaning if we run git status now, a command used to display the current state of the working directory and the staging area, we'll see something like this in the terminal:
If you run git diff --staged to see that our demo.txt file contains the changes made to it in the 2nd commit, but will have all the changes UP TO our 4th commit in staging.
git diff --staged shows you what changes have been added to the staging area with git add and are therefore prepared to be included in your next commit. It compares the current state of the files in your staging area to the version of those files that exist in your HEAD commit (the most recent commit on your current branch), which in our case will be the 2nd commit as we've reset the commit history to commit 2.
git reset can also be considered as the inverse of git add as it can un-stage any local changes done with git add and it also takes the same <file> argument as git add
All of this is due to our --soft flag. It is highly recommended that if you ever need to use the git reset, you should always use it with the --soft flag.
Now, let's create a new file and make some changes to it.
If we run git reset --hard 45022d6 to rollback our changes to our initial commit, we see the same result as before when we run git log but very different when we run git status, you'll see that our new file is lost and there are no mention of it in our staging area.
This is why we avoid a hard reset; it basically gives you a clean slate.
NOTE: Don't use git reset on public repos after pushing the commit
This should be obvious; other devs might be working on the pushed commits.
Resetting those commits can mess up collaboration, making it seem like part of the project history vanished when teammates sync up.
It creates a split between your local branch and the central repo’s branch, leading to confusing merge issues.
If you need to undo a public commit, use git revert instead. It’s built for that. Stick to git reset for local experiments gone wrong.
The git revert is a forward-moving undo operation that offers a safe method of undoing changes. Instead of deleting or "going back" commits in the commit history, a revert will create a new commit that reverses the changes specified. It is a safer alternative to git reset in regards to you clawing out your hair after losing your work.
Let's create a new git-revert-demo branch and commit some changes to our Readme.md file, our logs show us:
Now, if we run git revert HEAD, we'll be prompted to add a commit message for our new commit in our terminal editor, once we finish editing, and then run git log again, we'll see that a new commit with the changes to our file has been added to our commit history, as shown below.
No changes were lost, you've targeted specific commit changes, and it's very clear to understand if any of your team member gets to work on this code in the future.
Git Merge and Rebase
Phew, we're finally here to merge our changes.
git merge <branch_name> merges the specified branch onto the current branch you're running the merge from. So let's say if you've run git checkout main and then git merge feature-branch, you're pulling the changes from your feature-branch onto your main branch
This creates a new “merge commit” in the feature-branch that ties together the histories of both branches.
Merging is nice because it’s a non-destructive operation. The existing branches are not changed in any way. However it can result in unnecessary commits added to the feature-branch commit history and it can overwhelm and confuse other developers working on the project.
As an alternative to merge, you can run git rebase feature-branch
This moves the entire feature-branch to begin on the tip of the main branch, effectively incorporating all of the new commits in main.
But, instead of using a merge commit, rebasing re-writes the project history by creating brand new commits for each commit in the original branch.
The major benefit of rebasing is that you get a much cleaner project history. First, it eliminates the unnecessary merge commits required by git merge. Second, rebasing also results in a perfectly linear project history.
Similarly togit reset, the golden rule ofgit rebaseis to never use it on public branches.
Let's take our above example, what happens when we rebase our feature-branch into main.
The rebase moves all of the commits in main onto the tip of feature-branch. The problem is that this only happened in your repository. All of the other developers are still working with the original main. Since rebasing results in brand new commits, Git will think that your main branch’s history has diverged from everybody else’s.
The only way to synchronize the two main branches is to merge them back together, resulting in an extra merge commit and two sets of commits that contain the same changes (the original ones, and the ones from your rebased branch).
Sounds very confusing right?
So, before you run git rebase, always ask yourself, “Is anyone else looking at this branch?”
If the answer is yes, take your hands off the keyboard and start thinking about a non-destructive way to make your changes (e.g., the git revert command). Otherwise, you’re safe to re-write history as much as you like.
NOTE: Most of the time, you'll not use these commands directly from the terminal but a senior dev or team lead will be reviewing your PR, dropping comments for code improvement and later merging it to the main branch using a GUI provided by platforms like Github, Gitlab, Bitbucket, etc.
git cherry-pick
"Cherry picking" is the act of picking a commit from a branch and applying it to another. git cherry-pick can be useful in cases where a commit is accidentally made to the wrong branch. You can switch to the correct branch and cherry-pick the commit to where it should belong.
The usage of cherry-pick is pretty straight forward.
Let's take an example from the TS development ecosystem,
We have two devs, one front-end and one back-end both working on separate feature branches, and the front-end dev needs to make an API call to a specific back end Route, the development of which isn't completed yet but the result type of the response is ready to go in a specific commit.
The front-end dev can checkout to his own branch, select the specific commit containing the result type and just run run git cherry-pick <commit-sha>, this will create a new commit on his branch from where he can continue working on his features.
Cherry picking is also helpful when you need to ship a bug fix quickly to the end users.
Let's say a developer has started work on a new feature. During that new feature development they identify a pre-existing bug. The developer creates an new commit fixing this bug. This new patch commit can be cherry-picked directly to the main branch to fix the bug before it effects more users.
Apart from the above and some other specific use cases for cherry-pick command, git merge or git rebase are still preferred for most cases.
Conclusion
Git is a very vast technology, and there's still a lot to cover.
From different types of flags used along with the commands to pre-commit hooks for linting/formatting to managing different repos for dev, staging and production.to having automated checks before merging specific branches, triggers and bots to sync external APIs and a lot more.
But all of these will come under Git rules for CI/CD and will be covered in another article, as this has already been long enough.
I've tried to cram in the most useful ones in this article, hoping it would be enough for you to claim the title of "git expert" in your organisation.
If you like this article, consider following me on X at @Aadi__khare, I rant write about a lot of fun tech things there.
If you're a nerd like me and LOVE the tech drama insights, you'll enjoy my takes.
Until Next Time,
Happy Debugging Coding👋